
Thursday, April 23, 2015
Thinking of you
Well, I had some time to do a little coloring and make a quick card today. Nothing fancy, but I wanted to send a little something to someone and needed just a little note card to include. Thank goodness I was just practice coloring with some markers that I have that are no longer out on the market. It gave me a chance to practice simple principles like shading and grounding my image by giving it a foundation instead of having it floating in the air so to speak. The image I used is a image from Stampin Up. Cute little bear. After I was done I decided to use some more Stampin up products and used some Hello Honey card stock and a piece of DSP from a paper pack that I don't have the name of off hand. Now, I thought that while the Hello Honey cardstock is pretty it was just a little plain. Therefore what did I do???????That's right I got my ebrush. LOL. I used one of my medium tone green Spectrum Noir markers and I airbrushed a gentle mist over the Hello Honey cardstock. Well that sure made a difference for me. It definitely made it not so plain and also helped to tie together all the elements of the card. Here is the finished result and now it is all packaged up . Also lucky for me I could make my own envelope for this using my 123 punch board from We r Memory Keepers. I think I have had or have almost everything they have made that you can call a tool and I love them all. :) Anyway, here is my completed note card. Thanks for looking.
Saturday, April 18, 2015
Happy Bokeh
Well, I have been at it again. I had to ebrush today. Hahaha. However instead of using my Spectrum Noir(SN) in the machine I decided to use my Sharpie(SP) marker . It was an interesting experience. I have 2 styles. Sharpie and BIC. I will share that the BIC markers do not fit in the Sharpie adapter. They do fit in another adapter. Once I try it out I will share which adapter seems to work with them. :) In the mean time that is just a little heads up. Well, I wanted to really try my hand at Bokeh, which is a photographic effect where the back ground is distorted and the lights look like fuzzy circles of color. ( Basically how I see the world without my glasses. Hahaha) Anyway, I recently purchased a stencil from Hallmark Scrapbook . It was a stencil of varied circles. I used this stencil to help me make the background of this card . I used a variety of different Sharpie markers to create the bokeh inspired affect. After that I used my Misti to stamp the sentiment of Happy Birthday on it, followed by using the stamp set that I got from 3Bird. In it there was a balloon stamp. I stamped that as well using my Misti 3 times and then colored it using my Spectrum Noir markers. I tried a different way of coloring going from dark to light in a series of 3 colors within the same color family. I.E. TB1, TB2, TB3 and LV1, LV2, LV3 just to name a couple of color families used. I topped it all off by accenting the highlight in the balloon with my Sakura white gel pen and attached it to the card with a string accent around the bottom. Very simple card and I think perfect for anyone male or female, young or old. Anyway, here it is enjoy.

Thursday, April 16, 2015
ATC Newbie
I just realized I did not share this one. This is my first attempt at an ATC. I am so happy with the results. This one piece utilized so many pieces from so many sources. You would never believe that something so small would. Hahaha. I lucked out and had a Spellbinders Die set so I did not have to measure to cut my initial ATC shape. I just had to run my die through my bigshot. The best part is that since it is a die set I also had the correct size piece for the inside so I could cut the smaller shape from a piece of scrap paper and use it as a temporary mask to protect the center of the paper . I did that because I wanted to use my eBrush to do the edge of the paper. I think it came out so pretty.
I also forgot to mention that the paper is from Anna Griffin. So pretty.
I used my WRMK( we are memory keepers) corner rounder to round opposite corners of the design paper.
Then the coloring fun began with the help of my Stampin Up (SU) butterfly punch and matching stamp set. I used my Spectrum Noir (SN) markers and some pencils to color up the butterfly . Lastly I grabbed the sentiment from another SU stamp set( for got which one at the time of this post) and used a different Spellbingers die to cut it out. eBrush that one as well and added some rhinestone to it. Attach and all done. I look forward to making more ATC cards. Eventhough it had so many parts to it due to the sheer size of the project it went by very quickly. Enjoy.
Trying something new
Well recently I decided to try coloring up an image using my new Spectrum Noir(SN) pencils. Well, I have to say that I had to really work with this new medium. I have used other pencils in the past, namely Prismacolor, but I have just gotten into using my SN markers and even took a basic class on the pencils' use with the markers to cause depth. So I thought okay, let's do this ....lets do a complete image with the pencils. Hmm, all I can say is that I notice I need more work, which is good. Keeping in mind I am my own worse critic. Hahaha. I can say the colors are very vibrant and the pencils are very creamy. Surprisingly so. There are no names on the pencils only numbers. The nice thing is that they are laid you in light,medium, and dark groupings of each color. That is helpful, but did not last long with me once the creative process started. Hehehe.
I did achieve something very new , however. I did some nice shading to cause the image to look like the clothing had folds. It had a minimal amount, but where I achieved the best illusion of that was in hte bodice of the dress. It was complete flat before I did something like that. I really liked that. Anyway, here she is. This image is part of a set from 3 Birds. I got it in one of my recently hauls from HSN. Glad I am on autoship. Their new stamp like is awesome.

I did achieve something very new , however. I did some nice shading to cause the image to look like the clothing had folds. It had a minimal amount, but where I achieved the best illusion of that was in hte bodice of the dress. It was complete flat before I did something like that. I really liked that. Anyway, here she is. This image is part of a set from 3 Birds. I got it in one of my recently hauls from HSN. Glad I am on autoship. Their new stamp like is awesome.
Friday, April 10, 2015
Beautiful butterflies
Hello everyone. Well today has been a good day. I got a chance to play with my ebrush today. If you are unfamiliar with it it is an at home airbrush machine from Craftwell. I love it very much. I just want to be good at it so I decided to practice . I did make a card using it that I wanted to share .
The basic image that I used for the card came from Altenew. Love their stamps for coloring.

I really liked the butterfly so I decided to stamp it on some Stampin Up whisper white card stock using some Memento Toffee Crunch ink. Quick note that Memento is great to use with alcohol inks. It will not bleed at all.

Then it was time to turn on the machine. :)

Well, This is the color that I decided to use. It is from Spectrum Noir's alcohol marker 2nd generation line of markers.

Then the fun began. Now I will say that I am still getting used to the spraying technique as well as masking off things,which I ultimately did not do. :) I just tried to pay attention to the intense level of color in some areas. Then I went back over and used another color( not pictured) GB2 on the tips of the butterfly for contrast. Finally I used a fine tip black permanent marker on the accents of the wings and body. Then it was time to add it to a card.


Now for the sentiment. Well, I decided to use one of the sentiments from the stamp set, but to make sure I had ideal placement I used my new favorite tool ever. My MISTI ( most incredible stamping tool invented) I punched it out using my Stampin Up label punch and inked around the edges using the Memento Toffee Crunch ink. Finally I added some foam tape and attached it to the front of the card. The foam tape added great dimension.


Finally I attached all the pieces where they needed to go, and also did a small detail inside the card to finish it up. Love this card. Can't wait to play with my ebrush again.


Thanks so much for taking a look at my creation. I appreciate the support.
The basic image that I used for the card came from Altenew. Love their stamps for coloring.
I really liked the butterfly so I decided to stamp it on some Stampin Up whisper white card stock using some Memento Toffee Crunch ink. Quick note that Memento is great to use with alcohol inks. It will not bleed at all.
Then it was time to turn on the machine. :)
Well, This is the color that I decided to use. It is from Spectrum Noir's alcohol marker 2nd generation line of markers.
Then the fun began. Now I will say that I am still getting used to the spraying technique as well as masking off things,which I ultimately did not do. :) I just tried to pay attention to the intense level of color in some areas. Then I went back over and used another color( not pictured) GB2 on the tips of the butterfly for contrast. Finally I used a fine tip black permanent marker on the accents of the wings and body. Then it was time to add it to a card.
Now for the sentiment. Well, I decided to use one of the sentiments from the stamp set, but to make sure I had ideal placement I used my new favorite tool ever. My MISTI ( most incredible stamping tool invented) I punched it out using my Stampin Up label punch and inked around the edges using the Memento Toffee Crunch ink. Finally I added some foam tape and attached it to the front of the card. The foam tape added great dimension.
Finally I attached all the pieces where they needed to go, and also did a small detail inside the card to finish it up. Love this card. Can't wait to play with my ebrush again.
Thanks so much for taking a look at my creation. I appreciate the support.
Wednesday, April 8, 2015
Faery Ink Challenge for Spectrum Noir Connoisseurs
Just finished making a card for a challenge at Spectrum Noir Connoisseurs on Facebook. It was so fun and actually my first digi stamp to color up. The image was created by Amanda from Faery Ink. The challenge was to use the stamp and to use pink in it in some way( I decided to add it to her hair and to the background). We had to submit a completed project so I made a card. I had so much fun doing it. Well, the image started off like this.

I proceeded to color her skin first with my Spectrum Noir markers.

Then once I got her skin done I started to work on her hair.

I proceeded to add some shading to the hair. I was not sure how it would turn out, but I kept working on it.

After I finished coloring her all up I decided to use my ebrush from Craftwell and airbrush the back ground to my picture. That was so fun because it was only the second time that I have used it and I am really striving to get the hang of it. After that was all over I wanted to add a sentiment. That is when I got to use probably one of the best items created, the MISTI which can be purchased through My Favorite Things or through the inventor's website My Sweet Petunia. It makes stamping so much easier. Afterward I punched out the sentiment to the appropriate size and attached it to my card using Stampin Up dimensional.


Now this is my final result. I really love how it came out.

I proceeded to color her skin first with my Spectrum Noir markers.
Then once I got her skin done I started to work on her hair.
I proceeded to add some shading to the hair. I was not sure how it would turn out, but I kept working on it.
After I finished coloring her all up I decided to use my ebrush from Craftwell and airbrush the back ground to my picture. That was so fun because it was only the second time that I have used it and I am really striving to get the hang of it. After that was all over I wanted to add a sentiment. That is when I got to use probably one of the best items created, the MISTI which can be purchased through My Favorite Things or through the inventor's website My Sweet Petunia. It makes stamping so much easier. Afterward I punched out the sentiment to the appropriate size and attached it to my card using Stampin Up dimensional.
Now this is my final result. I really love how it came out.
Tuesday, April 7, 2015
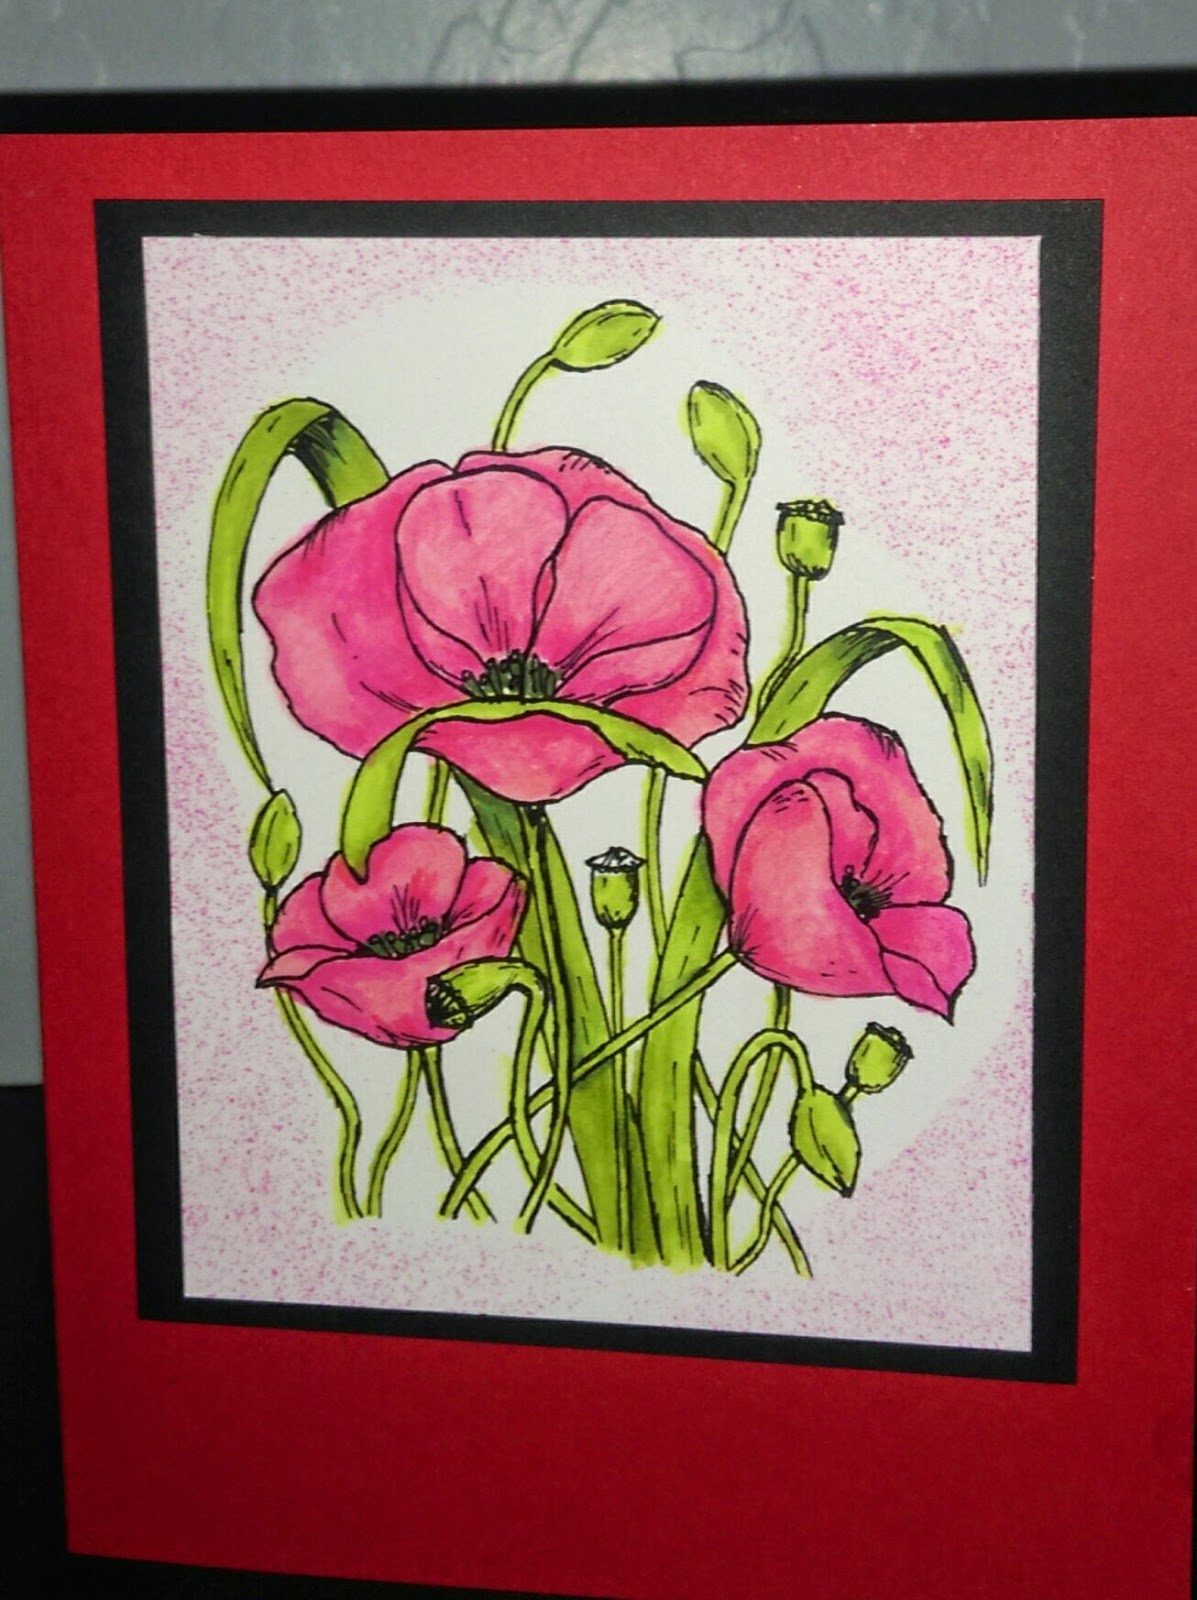
Poppies?
Hey everyone. Well I was brave enough to attempt it again. Those nibs. Hahaha. I don't know I just have this determination to not let anything prevent me from mastering a crafting technique I guess. Anyway the image I used this time was from a craft convention that I attended not too long ago. It was a basic coloring class given by BeeCreative. In that class they gave us some Spectrum Noir markers, which was my first introduction to them , and also some things to color up when we had the time. I started but never finished until yesterday. :) I know that the only way I am going to get the hang of blending with these new toys is by practice. Here is the picture of the Poppies that they shared. I think you spell it that way. :) You can always let me know what you thing. When I get good enough or even close enough to being good I will do a tutorial I think. :) I did get a chance to use another one of my new toys. The ebrush. Very lightly I have to add. I was nervous to overdo anything since I did not have the image in order to make a traditional mask for it. Anyway here it is. Thanks for looking.
Sunday, April 5, 2015
Grabbing the rose by the petals
Hello everyone. Have you ever had the situation where you have done something and you have been just undecided about it? I just had that happen. Just colored up an image from Altanew. It gave me a chance to use my Spectrum Noir markers. Now I was just hyper critical. Why? Because the markers have nib ends. Yep not a brush tip in sight and I have not made it a secret that I love my brush tips. I felt so awkward. I usually flick, glide. Now I had to circle. So many new movements for my hands to make. Anyway, I finished the coloring. Yeah. Was I happy with it.....No. Hahaha. So what did I do? Go on some group pages and asked what could I improve on. I am not happy with it( thinking surely they see the awkwardness of my circle technique or that the blending was not great and they would tell me so) Well guess what happened? They were not critical, had no suggestions on improvement and in fact complimented my creation. What?! ....Yep . They complimented it and said that it looked great. Well that was really eye opening and just proved something to me. No matter how much you may not like what you have done don't judge it and withhold it from others. You never know what a person may like.

Products used:
Rose stamp from Altanew
MISTI
Spectrum Noir Alcohol Markers
Whisper White SU Cardstock
Products used:
Rose stamp from Altanew
MISTI
Spectrum Noir Alcohol Markers
Whisper White SU Cardstock
Thursday, April 2, 2015
Love HSN Craft Day
Well, I like so many others love HSN craft day. It was last week and honestly I could not wait until I got my goodies in the mail. Can you say stalking the UPS guy anyone. :) Well, all my goodies came in and believe me it has been awesome. One of the pieces that I got that I am really excited to try is the Ebrush from Craftwell. It is a airbrush system that uses markers instead to the traditional airbrushing where you use the ink in the tool. No clean up really and who does not like no clean up! Can't to share a masterpiece or two. Hahaha. Here is a link to the site so you can check out the product. Craftwell Ebrush Here is my haul video. Thanks for watching.
Subscribe to:
Comments (Atom)